How to Replace Air Admittance Valve: Step-by-Step Guide
Call for how to replace air admittance valve guidance. Covers signs, removal, right-size selection, and dual-seal AAV installation for smooth drainage.
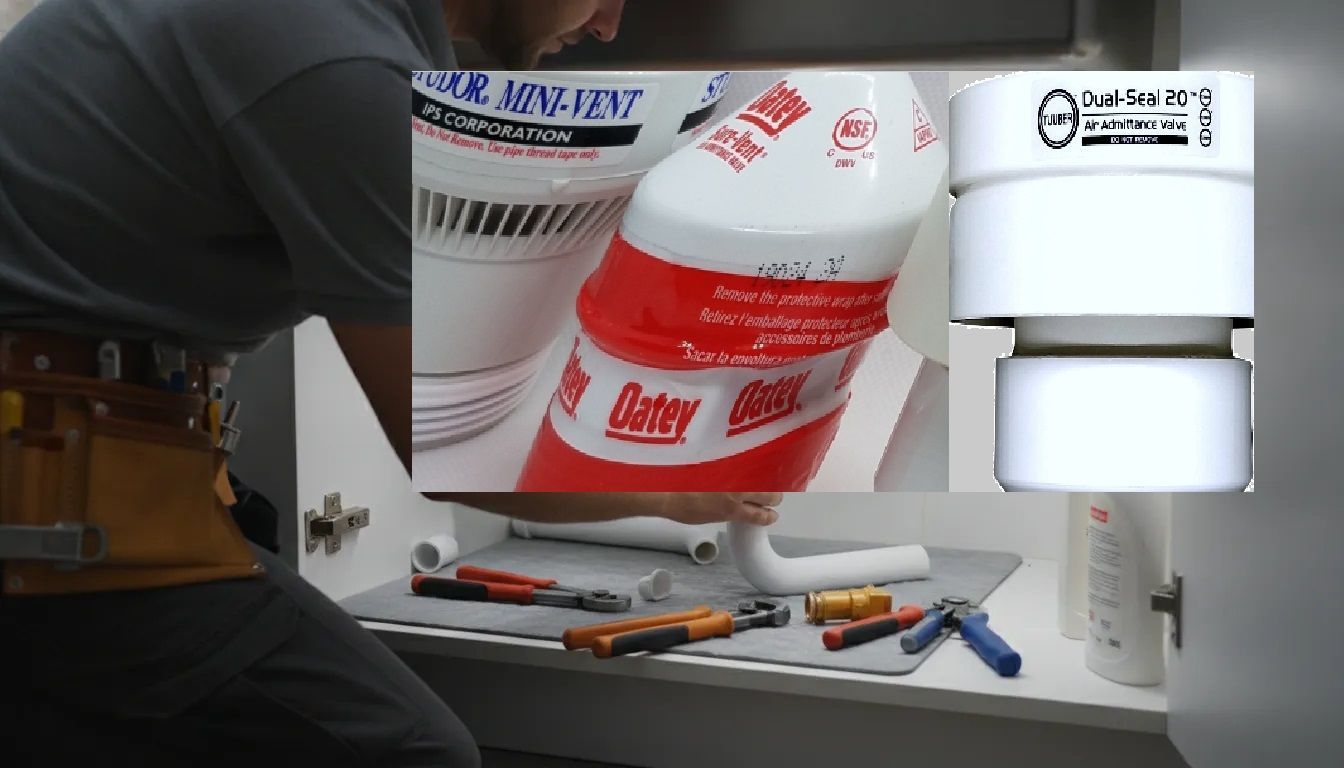
A failed air admittance valve can turn a quiet drain problem into sewer odors, gurgling, slow drainage, or a plumbing callback. Because the valve helps equalize pressure and protect the trap seal, replacement should address both the failed component and the conditions that may have contributed to the failure.
Tuuber dual-seal replacement AAVs designed for long-term sealing reliability and backed by a Limited Lifetime Warranty.
To learn how to replace air admittance valve, confirm the failure, remove the old valve without damaging the drain connection. Select a replacement with the correct connection and DFU capacity. Install it upright and verify smooth drainage and an intact seal.
Replacing an AAV is often a practical maintenance task, but the replacement still needs to fit the DWV system and applicable installation requirements. The air admittance valve installation guide provides additional application context. Start by identifying the symptoms that show the existing valve is no longer working properly.
Signs That Your Air Admittance Valve Needs Replacing
An air admittance valve should open during drainage to admit air, then close to help contain sewer gases. When its sealing mechanism fails, the symptoms often appear at the connected fixture. Recognizing them early helps you decide whether the valve needs cleaning, troubleshooting, or replacement.
Sewer gas odors near the fixture
An intermittent sewage or rotten-egg odor around a sink, drain, or cabinet is one of the clearest warning signs. A leaking or stuck-open AAV can allow sewer gases to escape continuously instead of maintaining the intended seal. Sewer gas may contain hydrogen sulfide, which the CDC identifies as a health hazard at high concentrations. Do not ignore a persistent odor. Ventilate the area, limit exposure, and investigate the valve and the fixture's P-trap.
Gurgling or bubbling drains
Gurgling sounds after a fixture drains can indicate that air is not entering the DWV system smoothly. A failed valve may not open correctly, or debris may have fouled its internal sealing mechanism and restricted movement. A blockage elsewhere in the drain stack can create similar symptoms, so check the broader drainage system before concluding that the AAV is the only problem.
Slow drainage without an obvious clog
If water drains slowly even after the trap and drain opening are clear, a malfunctioning AAV may be disrupting pressure balance. The problem can be especially noticeable when another connected fixture is used. Confirm that the drain line is not obstructed and that the valve is correctly sized and installed before replacing it.
Visible damage or a valve stuck open
Cracks, stains, corrosion, loose connections, or visible deformation are strong reasons to replace an AAV. You may also find that the valve remains open instead of closing after drainage. Debris or residue can prevent the internal seal from seating. Do not attempt to restore a damaged housing with sealant. Replace the unit and inspect the threaded connection for damage.
For a concise visual checklist, review these signs of a failed air admittance valve. If the symptoms persist after replacement, inspect the P-trap, drain line, and other venting components rather than repeatedly changing the valve.
Q: How do I know if my air admittance valve needs replacing?
A: Sewer gas odors, gurgling drains, unexplained slow drainage, visible damage, or an AAV that remains stuck open indicate that the valve may have failed. Rule out a blocked drain and inspect the P-trap, then replace the valve if its seal or housing is damaged.
Tools and Supplies You Need Before Removing an Old AAV
Gather the replacement parts and basic safety supplies before you loosen the existing valve. Replacing an AAV is generally straightforward and does not require specialized plumbing tools, but the replacement must match the existing connection and the drainage system's capacity.
Replacement air admittance valve: Choose the correct connection size and type for the existing drain assembly. Confirm that its drainage fixture unit (DFU) capacity is adequate for every fixture served by that branch. A valve with insufficient capacity can restrict airflow and contribute to slow draining. Tuuber's product line includes 1-1/2-inch valves rated for 8 DFU and 2-inch valves rated for 10 to 12 DFU. But always confirm the load and applicable local requirements before buying. Review available AAV options.
Teflon thread seal tape: Use tape on the male pipe threads to help create a gas-proof seal. Wrap the tape clockwise, looking at the threaded end, for three even layers. Keep it on the threads rather than covering the opening, and leave the first thread clear so material does not enter the drain.
Strap wrench, optional: A strap wrench can provide controlled grip if the old valve is difficult to loosen. It is preferable to forcing the plastic body with large pliers, which can deform or crack it. In many cases, the old unit can be unscrewed counter-clockwise by hand or with light, careful assistance. See Tuuber's replacement guidance.
Safety gloves: Wear gloves when handling the failed valve and nearby drain components. They provide a cleaner, safer grip during removal.
Bucket and towel: Place a bucket below the connection and keep a towel nearby. Residual water or trapped moisture may escape when the valve is removed.
Plumber's putty, for backup: Keep putty available only if the specific threaded connection or surrounding fitting requires a backup sealing method. Follow the fitting and product instructions rather than adding sealant indiscriminately.
Choose the replacement design before you start
If the original valve is single-seal, compare it with a dual-seal design rather than replacing it solely by appearance. Tuuber's dual-seal technology is engineered for long-term sealing reliability. Whichever design you choose, match the connection, vertical installation requirements, DFU capacity, and jurisdictional code requirements. During installation, hand-tighten the new valve only. Overtightening can crack plastic threads or damage the valve body, creating a leak that may not be obvious immediately.
Install the replacement AAV by hand to avoid overtightening the plastic threads.
How to Replace a Failed Air Admittance Valve Without Damaging the Drain Arm
Removing an old air admittance valve is usually straightforward, but the connection beneath it can be fragile. Work slowly, support the drain assembly, and stop if the valve is fused to the fitting or the pipe begins to twist. The goal is to remove the failed component while leaving a clean, usable connection for the replacement.
Shut off the nearby water supply. If you are working beneath a sink or close to a fixture drain, turn off the fixture's supply valves first. Open the faucet briefly to relieve pressure, then avoid using the fixture while the valve is removed. Keep a towel and bucket within reach.
Place a bucket below the valve. Residual water in the drain arm or fitting may spill when the connection opens. Position the bucket so it catches drips without forcing you to pull or reposition the piping.
Unscrew the old valve counter-clockwise. Hold the fitting or pipe below the valve with one hand, then turn the failed unit counter-clockwise by hand. This protects the drain arm from twisting. If hand removal is not possible, use pliers carefully on the valve body, avoiding excessive force on plastic threads.
Use a strap wrench for a stuck valve. A strap wrench can provide controlled leverage without biting into and crushing the plastic. Apply steady pressure rather than jerking the tool. If the pipe, adapter, or drain arm starts to rotate, stop and reassess the connection. A stuck valve may require a plumber, especially where there is very little pipe to work with.
Cut below a glued valve when it cannot be unscrewed. Glued valves are not removable by turning. Make a clean, square cut in the pipe below the valve, leaving enough sound pipe for a threaded adapter coupling. Deburr the cut and follow the fitting manufacturer's solvent-cement instructions. If the remaining pipe is too short or damaged, do not force a repair that could compromise the drain arm.
Clean and inspect the connection. Remove old Teflon tape, residue, and debris from the pipe threads or adapter. Check for cracked plastic, flattened threads, distortion, or blockage. A clogged DWV stack can mimic an AAV problem, so inspect the accessible drainage path rather than assuming the valve was the only fault. IPS Plumbing Products recommends checking the DWV stack for blockages during troubleshooting (troubleshooting guidance).
Confirm the replacement connection before installing it. Match the new valve's threaded connection to the existing plumbing configuration. This check prevents cross-threading and avoids adapting the drain arm unnecessarily. For broader application-specific guidance, see the air admittance valve installation guide.
Do not overtighten the old or new valve while working through the connection. Excessive force can crack plastic threads or the valve body, creating a leak that may not appear until the drain is used. Once the connection is clean and sound, proceed with the replacement installation.
Browse Tuuber dual-seal AAVs. Find the right size and DFU rating for your system.
How to Select the Right Replacement AAV Size and Certification
Start with the connected fixture load, then confirm the threaded connection, applicable code requirements, and the valve's sealing design. The correct replacement should handle the total drainage fixture unit (DFU) load without restricting airflow. For a deeper explanation of the pressure-balancing function, see understanding how air admittance valves work.
Calculate the connected DFU load
Add the DFU values for fixtures served by the same drain branch. Common residential values include:
Private toilet: 3 DFU
Sink: 2 DFU
Bathtub: 2 DFU
Washing machine: 3 DFU
Tuuber's 1-1/2-inch valves are rated for up to 8 DFU. A 2-inch valve provides a 10 to 12 DFU capacity option, depending on the product configuration. Select a capacity that meets or exceeds the total connected load, and verify local plumbing requirements before installation. An undersized valve can restrict airflow and contribute to slow drainage. When the branch serves multiple fixtures, the total system DFU load must remain within the AAV's capacity rating.
Confirm compliance and connection size
Match the replacement valve's connection to the existing plumbing so installation does not require unnecessary changes to the drain arm. Tuuber valves comply with ASSE 1050 and ASSE 1051 performance standards for drainage, waste, and vent systems. The word "certification" is often used broadly in product searches, but compliance should be confirmed for the specific valve and the jurisdiction where it will be installed.
Seal design is another important replacement decision. A single-seal valve may be more vulnerable to a failed sealing mechanism. And Tuuber reports that single-seal AAV failures can account for 15 to 20 percent of contractor callbacks. Compare the construction and support behind each option before choosing a replacement. The table below compares the two approaches.
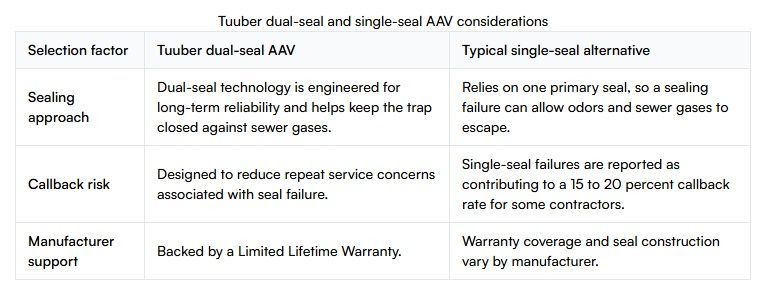
Tuuber dual-seal and single-seal AAV considerationsSelection factorTuuber dual-seal AAVTypical single-seal alternativeSealing approachDual-seal technology is engineered for long-term reliability and helps keep the trap closed against sewer gases.Relies on one primary seal, so a sealing failure can allow odors and sewer gases to escape.Callback riskDesigned to reduce repeat service concerns associated with seal failure.Single-seal failures are reported as contributing to a 15 to 20 percent callback rate for some contractors.Manufacturer supportBacked by a Limited Lifetime Warranty.Warranty coverage and seal construction vary by manufacturer.
For more detail on the design decision, read about choosing a replacement air admittance valve. Choose the smallest compliant valve that safely covers the calculated load, or step up to the larger capacity when the connected fixtures require it.
Installing the New Valve and Verifying It Seals Correctly
Once the old valve is removed and the pipe nipple is clean, install the replacement carefully. A proper thread seal, upright position, and practical water-and-odor check help confirm that the new AAV is working as intended.
Prepare the male threads. Wrap the exposed male threads with Teflon tape, working clockwise in the direction the valve will tighten. Use three snug layers and keep the tape on the threads rather than covering the opening. This helps create a tight, gas-proof connection. Tuuber's installing your new air admittance valve guide provides additional application-specific instructions.
Thread on the replacement AAV. Start the valve by hand so the threads engage cleanly, then hand-tighten it onto the pipe nipple. Do not overtighten. Excessive force can crack plastic threads or damage the valve body, creating a leak that may not appear until the system is used.
Set the valve upright. Confirm that the AAV is vertical, with its opening and internal sealing mechanism positioned upright. Keep it within 15 degrees of vertical. This orientation allows the internal diaphragm or seal to operate correctly under gravity, as described in the ICC installation guidance. Make sure the valve remains accessible for future inspection.
Restore water and test every connected fixture. Turn the water supply back on if it was shut off. Run water through each sink, appliance, or other fixture connected to the drain line. The replacement should support smooth drainage without backing up, bubbling, or producing unusual gurgling.
Check the connection for leaks. While the fixtures drain, inspect the threaded joint and surrounding pipe. Look and feel for moisture around the connection. A dry joint and smooth drainage indicate that the installation is performing normally. If you see a leak, shut off the water, remove the valve, inspect the threads, and reseal it rather than tightening aggressively.
Perform an odor check. After several flush and drain cycles, check the area around the valve and fixture for sewer odors. A correctly functioning AAV should admit air when needed while keeping sewer gases from entering the room. If odors persist after replacement, verify the P-trap's water seal and inspect nearby drainage piping for other leaks, following Tuuber's AAV failure guidance.
For application-specific layouts and additional installation guidance, review Air Admittance Valve Installation: How-To Guides for Every Application.
Carefully remove the old valve by hand or with a strap wrench to avoid damaging the drain arm connection.
Get the right Tuuber dual-seal AAV for your plumbing system and protect your fixtures with patented dual-seal technology.
Frequently Asked Questions
How do I replace an air admittance valve?
Shut off nearby fixtures, remove the old valve by turning it counter-clockwise, and inspect the threaded connection for damage or debris. Wrap the new valve's male threads clockwise with thread seal tape, then install it by hand. Hand-tighten only to avoid cracking plastic threads. Run water through the connected fixture afterward and check for smooth drainage, leaks, and returning odors.
How do I know if my air admittance valve is bad?
Common warning signs include sewer gas odor near the fixture, gurgling, slow drainage, or a valve that is visibly leaking. If symptoms continue after replacement, inspect the P-trap and surrounding drain connections because a failed trap seal or hidden leak can produce similar odors. A blockage elsewhere in the DWV system can also mimic valve failure.
Can I replace a glued air admittance valve?
Yes, but a glued valve cannot usually be unscrewed from the pipe. Cut the pipe below the old valve carefully, then install a compatible threaded adapter or coupling so the replacement can be serviced later. Confirm the new connection matches the existing pipe size and configuration before cutting.
Can I install an air admittance valve at an angle?
No. Install the valve vertically and upright so its internal sealing mechanism can operate correctly. Plumbing guidance also commonly calls for the valve to be at least four inches above the horizontal branch drain. Verify the applicable requirements with your local plumbing authority or inspector, since installation rules vary by jurisdiction. ICC guidance discusses placement and installation considerations.
How do I choose the right replacement size?
Match the replacement to the pipe connection and calculate the combined Drain Fixture Unit load served by the valve. The selected AAV should have enough capacity for that total load. For reference, Tuuber lists 1-1/2-inch models at 8 DFU and 2-inch models at 10 to 12 DFU. Always check the specific product rating and applicable local requirements before installation.
Ready to Replace a Failed Air Admittance Valve?
A properly selected and installed replacement AAV can help restore smooth drainage and protect the fixture trap from sewer gas. Review Tuuber's replacement options and get product guidance for your application. Shop Tuuber replacement AAVs. Choose the next step with confidence.