What Is a Studor Vent? How Studor Venting Works and Why Contractors Are Switching
How to Plumb a Studor Vent: Installation Guide and Dual-Seal Alternative Comparison
Learn how to plumb a Studor vent with code-aware installation steps, sizing, placement, testing, and a Tuuber Dual-Seal 20 comparison for safer AAV decisions.
How to Plumb a Studor Vent: A Practical Guide
This guide covers installation, sizing, placement, code checks, and comparison considerations for Studor vents and other air admittance valves.
A Studor vent is an air admittance valve (AAV) that admits air when negative pressure develops in a drain system, then closes to help limit sewer gas escape. Learning how to plumb a Studor vent requires more than attaching a valve beneath a sink. The fixture load, trap arm, riser height, orientation, access, testing, and loc
al code all affect the result.
Short answer: connect a correctly sized AAV to an approved fixture or branch layout. Keep it vertical and accessible, install it at the required height above the drain, and verify the rules enforced by the authority having jurisdiction. Individual and branch AAVs commonly require at least 4 inches above the horizontal drain, while stack applications can use different height rules. An AAV does not replace every open vent or local approval.
This guide is for plumbing professionals, contractors, and careful DIY homeowners. Use it as a planning aid, then follow the selected valve instructions and the code adopted at the project location. For broader product-selection context, see the Air Admittance Valve Comparison and Product Selection guide.
How to Plumb a Studor Vent Safely, Step by Step
Begin with the drainage layout, not the valve package. Studor is commonly used as a brand name for an AAV, but the permitted application depends on the adopted code, fixture group, and product listing. The valve should serve an approved individual, branch, or other permitted arrangement. It is not a universal substitute for an open vent that must extend outdoors.
- Confirm the code path. Check the adopted IPC, UPC, or IRC provisions, local amendments, and inspection requirements before cutting pipe. The ICC air admittance valve code notes explain why application, access, and connection details must be evaluated together.
- Identify the fixture and trap arm. Mark the fixture drain, trap, trap arm, horizontal branch, and intended vent takeoff. Confirm which fixtures the valve will serve and whether the applicable rule limits the layout to the same floor level.
- Install a vertical riser. Use an approved fitting and orient the riser so it rises from the drain connection. Support the run and avoid a horizontal dead end that could collect condensate or debris.
- Set the required height. For an individual or branch AAV, the valve commonly sits at least 4 inches above the horizontal drain it serves. Stack-type installations may require at least 6 inches above the flood-level rim of the highest fixture. Measure from the correct reference point, not from a cabinet shelf.
- Complete required testing. Use compatible materials, the specified adapter, and the correct joint-preparation method. If the inspection process requires a DWV test before the valve is installed, protect the open riser during testing and fit the AAV afterward.
- Leave the valve accessible. Do not bury it behind a finished wall or put it where an inspector or service technician cannot reach it. The air inlet also needs an environment that allows normal operation.
For product-specific connection details, compare the selected valve with the Tuuber AAV instructions. Before closing a wall or cabinet, inspect every joint, confirm that the riser is stable, and make sure the valve can be removed without cutting finished surfaces.
For a clean handoff, keep a simple installation record with the valve model, connection size, calculated DFU load, measured height, and the code source reviewed. This record helps another technician understand the work without opening the finished wall.
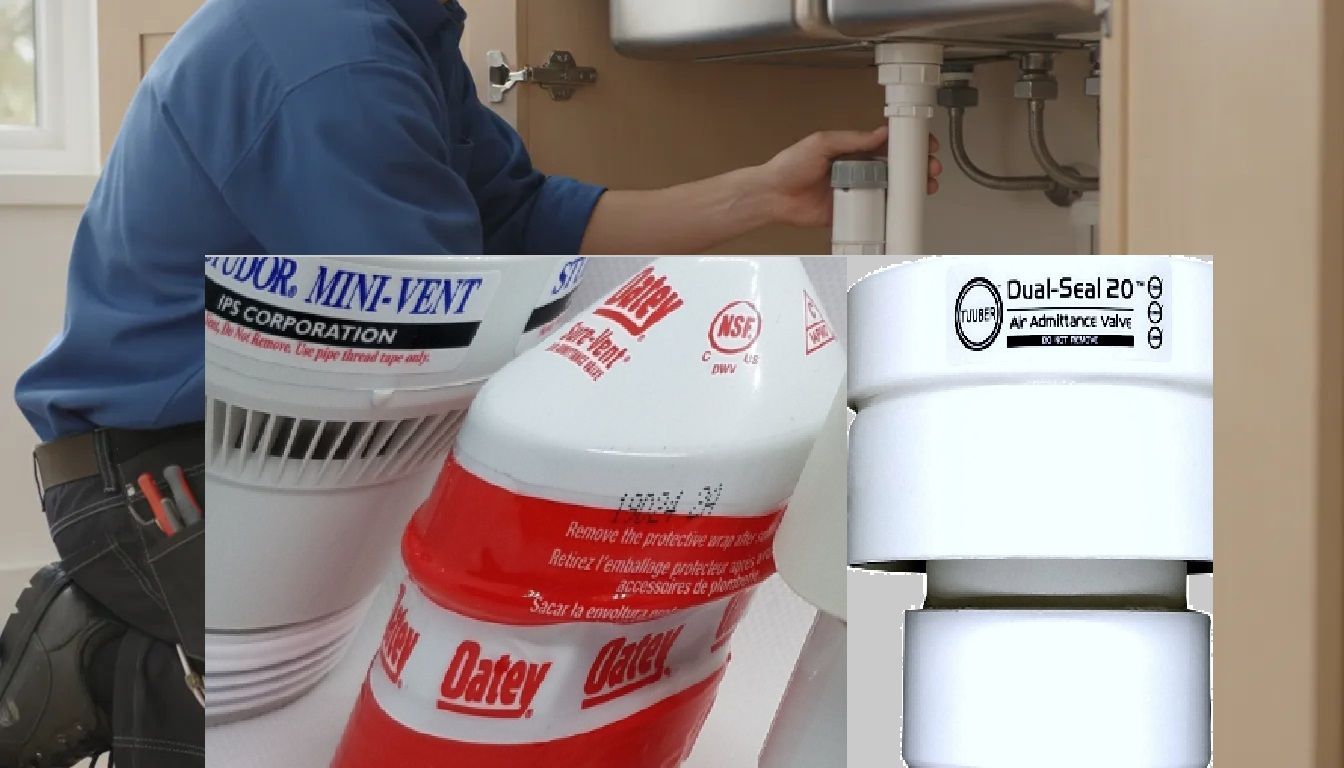
A vertical riser keeps the AAV positioned for airflow, inspection, and service.
How to Plumb a Studor Vent After Calculating Fixture Load
Valve size should follow both the connected pipe and the drainage fixture unit (DFU) load. A larger threaded connection is not automatically better when the branch, fitting, or code design does not support it. Add the served fixture units using the table required by the adopted code. Then select a valve whose instructions list a capacity that meets or exceeds the calculated load.

Selection checkWhat to confirmPipe connectionThe thread or adapter size matches the riser and approved fittings.DFU capacityThe listed capacity meets or exceeds the fixture load being served.Application typeThe individual, branch, or stack rating matches the intended layout.Local acceptanceThe authority having jurisdiction permits the selected AAV in that use.
Tuuber identifies its 1-1/2 inch model, 174015, with an 8 DFU rating for individual and branch applications. The 2 inch model is intended for higher-capacity applications, but selection still depends on its listed rating and the local design. Review the Tuuber technical specifications before choosing a model.
A sink retrofit may have a smaller load than a branch serving several fixtures. Do not size from the visible drain diameter alone. If the load, configuration, or local rule is unclear, pause before installation and ask a qualified trade professional or the authority having jurisdiction to review the design.
For a replacement, record the existing pipe size and the number of fixtures connected to the branch. Then compare that information with the selected valve's installation instructions. This simple record helps prevent a common mistake: choosing a valve because its connection fits while overlooking its listed application or DFU limit.
Keep sizing separate from brand preference. A Studor vent, a Tuuber AAV, or another listed product still has to match the drain layout and local requirements. The final decision should be based on the approved application, capacity, certification, dimensions, and service access.
Why Studor Vent Placement Rules Follow AAV Code Requirements
Placement protects valve performance and inspection access. An AAV needs a stable vertical position, adequate air circulation, and enough clearance for service. Keep it inside the building envelope unless the applicable instructions and local rules state otherwise.
Height and orientation
Individual and branch AAV rules commonly require at least 4 inches above the horizontal drain or fixture drain being vented. Residential rules may also require at least 6 inches above insulation. Keep the valve within 15 degrees of vertical where that is the applicable requirement. Stack products use a different reference point, so do not apply a branch-vent measurement automatically.
Access and air supply
Place the valve in an accessible cabinet, service space, or approved enclosure. Do not seal the inlet inside an airtight box. Avoid freezing exposure, outdoor conditions, chemical waste, or persistent contamination unless the product instructions and local authority specifically allow the use.
Open vents and positive pressure
An AAV admits air to address negative pressure. It does not provide the same function as an open vent that relieves positive pressure to the outdoors. The complete DWV design may still require an open vent, relief vent, or another approved connection. The air admittance valve code requirements are a useful reference, but the enforced local edition controls.
Studor vs Tuuber: Is the Installation Any Different?
The basic installation logic is similar for any approved AAV. Calculate the load, use the correct connection, keep the valve vertical, meet the required height, provide access, and follow local code. The meaningful comparison is product construction, certification, instructions, and listed application, not just the name on the cap.
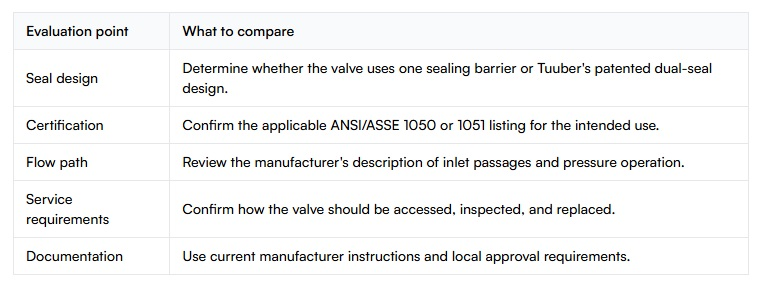
Evaluation pointWhat to compareSeal designDetermine whether the valve uses one sealing barrier or Tuuber's patented dual-seal design.CertificationConfirm the applicable ANSI/ASSE 1050 or 1051 listing for the intended use.Flow pathReview the manufacturer's description of inlet passages and pressure operation.Service requirementsConfirm how the valve should be accessed, inspected, and replaced.DocumentationUse current manufacturer instructions and local approval requirements.
Tuuber's Dual-Seal 20 design uses two independent seals and a triple-flow passage. Tuuber describes the valve as opening under negative pressure and closing by gravity at neutral or positive pressure. That gives installers a reason to compare sealing architecture rather than treating all AAVs as interchangeable. See the Tuuber AAV product overview and the live AAV comparison and product selection guide.
The comparison guide is the closest live cluster resource for the requested Studor, Oatey, and Tuuber selection topic. The originally planned pillar URL was not live when checked, so this article links to the verified guide instead of sending readers to a dead page. Use that guide when you need a broader comparison before selecting an AAV for a specific fixture or branch.
Compare the listed application, certification, seal design, and service requirements before selecting an AAV.
When to Replace a Studor Vent with a Dual-Seal AAV
Replacement should begin with diagnosis. A sewer odor, trap disturbance, visible contamination, failed test, or a valve that no longer operates smoothly may indicate a problem with the valve, the surrounding layout, or another part of the DWV system. Replacing the device without checking the cause can leave the original issue in place.
- Check the layout. Verify height, vertical alignment, access, connection integrity, and whether the valve is used in an approved application.
- Check the load. A valve that is too small for its listed DFU application can create performance and inspection concerns.
- Check the environment. Look for freezing exposure, chemical contamination, debris, restricted air supply, or an enclosure that prevents service.
- Compare the replacement. Confirm certification, application rating, dimensions, connection, instructions, and seal architecture.
A Tuuber Dual-Seal 20 AAV can be an upgrade path when the selected model fits the approved layout and its listed capacity. Its two independent seals are intended to provide redundant protection against sewer gas, while the triple-flow passage supports pressure-sensitive operation. Product choice does not remove the need for correct installation or local approval.
Contact Tuuber Valves to review your AAV selection and installation plan
Frequently Asked Questions
What is a Studor vent?
A Studor vent is commonly used to describe an air admittance valve. It opens to admit air when negative pressure develops in an approved drain layout, then closes to help limit sewer gas escape. Install it according to the product instructions and the code enforced locally.
How do you plumb a Studor vent under a sink?
Confirm the permitted layout and fixture load. Connect an approved vertical riser, install the correctly sized valve at the required height, keep it accessible, and complete required DWV testing. Follow the manufacturer's instructions for the exact fitting and connection.
What is the minimum height for a Studor vent?
Individual and branch AAV rules commonly require at least 4 inches above the horizontal drain or fixture drain being served. Stack applications can use a different reference point, such as the flood-level rim. Verify the adopted local rule before installation.
Does my local code allow air admittance valves?
Many jurisdictions allow AAVs when the product meets the required standard and the installation follows the adopted code. Some areas impose additional limits or require approval by the authority having jurisdiction. Check with the local code office before work begins.
Can I use a Studor vent for a kitchen sink?
A kitchen sink may be eligible for an AAV in some approved layouts, but the fixture load, trap-arm arrangement, valve height, access, and local rules all matter. Do not assume an under-sink location is automatically approved.
When in doubt, pause the installation and verify the design before covering the piping. A short review can prevent a difficult correction after the cabinet or wall is finished.
A photo of the open cabinet or service space can also show that the valve remains accessible. Keep it with the installation record for future service.
Do not treat a familiar brand name as a substitute for an approved design. A Studor vent is still an AAV, and every AAV must match the use for which it is listed. When the project involves several fixtures, unusual geometry, or a jurisdiction with stricter rules, have the complete DWV layout reviewed before materials are permanently installed.
That planning step is especially useful when comparing replacement products. Look at the connection, capacity, certification, dimensions, instructions, and seal design together. The best choice is the valve that fits the approved layout and can be inspected and serviced throughout the life of the plumbing system.
Use the same checklist for a new installation or a repair. It keeps the decision tied to the system instead of to a single product feature. The result is easier to explain to an inspector, customer, or future service technician.